Last Updated on 05/11/2023
If you need to add funds to PlayStation Network wallet, then you can check out this guide from Overly Technical to see how you can do so by using the PlayStation App.
How to automatically add funds to the PS App
To automatically add funds to your PSN wallet via the PlayStation App, you need to do the following:
1. Of course, you need to install the PlayStation App on your smartphone or mobile device if you haven’t done so already. You can find this application by searching the Google Play Store on Android devices or Apple App Store on iOS devices.
2. Afterwards, open the PS App.
3. Sign into your PSN account if you are asked to do so.
4. After getting into the PlayStation App, tap the shopping bag icon, which you can find located at the bottom of the screen.
5. Inside of the PlayStation Store section of the application, you then need to tap the icon that has the three horizontal lines located on the top right side of the screen.
6. In the pop-up menu, you then need to select Payment Methods.
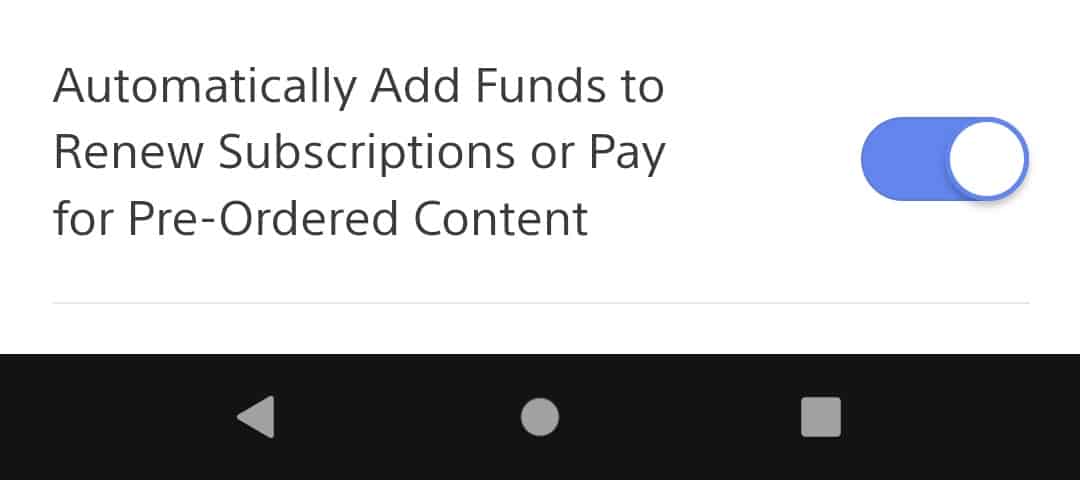
7. In the Payment Settings menu, make sure that the “Automatically Add Funds to Renew Subscriptions or Pay for Pre-Ordered Content” feature is turned on.
Funds will now be automatically added anytime you need more money in your PSN wallet to renew a subscription or pay for a pre-ordered content.
Can you add a set amount of funds to the PlayStation App?
You can’t add a set amount of funds on the PlayStation App. Instead, you need to visit the PlayStation Store website by using a web browser app such as Chrome or Firefox. In order to do so, you can take the following steps:
1. Go to the PlayStation Store website. If you are using Chrome, you need to visit the site using the Incognito Mode. For Firefox, you need to be using the Private Window.
Otherwise, you may be brought back to the PlayStation App.
2. On the PlayStation Store website, select the Sign In option.
3. On the next screen, input the email address for your PSN account and then select Next.
4. You then need to enter the password and then select Sign In.
5. After signing into your PlayStation Network account, tap your profile picture on the top right corner of the screen. It should be right next to the shopping cart icon.
6. In the small pop-up menu, select Payment Management.
7. After getting to the Payment Settings menu, select Add Funds.
8. In the Add Funds to Wallet menu, select your Funding Method. You can also add a new credit card, debit card or PayPal account in this menu.
9 After Choosing the funding method, you should be in the Add Funds to Wallet menu. Here, you can select the funding increment (in the U.S region, you can choose between $5.00, $10.00, $25.00, $50.00 or $60.00).
10. Select the Add Funds option to finish adding funds to your PlayStation Network wallet.